Showing posts with label floral. Show all posts
Tuesday, September 15, 2015
Wednesday, May 21, 2014
I Heart Nail Art
Many of you have probably scrolled through Twitter, Instagram, or Facebook at some point this month and stumbled upon a link begging for votes in a Sally Hansen nail art contest. Yes, those links are all rooted from one of my social media pages and thanks to everyone who has taken a second out of their day to vote, I have reached over 400 votes! I have received many questions regarding the "I Heart Nail Art" contest put on by Sally Hansen so here is where I will answer those and also fill you all in on the super-simple-easy-to-do nail art I submitted!
Regarding the contest, winning this month provides the winner with $500 and a guaranteed spot in a nail art competition in New York. The competition will be held at Sally Hansen head quarters August 11-13 and is all expense paid for the winner and one guest. The competition itself is for the 3 winners from the May, June, and July contests being held by Sally Hansen. One of the 3 competitors will be named best nail artist of the year and will also receive $2,000 as well as many Sally Hansen products. In all honesty, I would love being referred to as the Best Nail Artist of the Year, just as much, if not more, than the $2,000. That would be totally amazing right? Wow "Harli Hall: Best Nail Artist of the Year" has a nice flow to it, don't ya think?
The next question I am often asked is regarding voting. I know it is kind of a pain to vote sometimes. Sometimes it will say you have already voted and sometimes it won't let you vote at all. Every person is allowed one vote every 24 hour period. If you wait 24 hours, it should allow you to vote. If you have waited the 24 hr period and it still says you have already voted, hit the check mark next to vote twice and even though the number of votes I have received may not immediately changed, it will at some point!
Lastly, I really need everyones help in order to pull this off! I know it is so tedious to do, but if everybody could just keep voting and sharing daily, then I can get there! I am still one of the top competitors at this point, but without votes I will not stay there long! So please take 5 seconds out of your day and vote... maybe force your BFFs to vote daily as well. ;)
Now, without further ado, here is the nail art I submitted and how to get them yourself!
You Will Need:
Step 1:
Apply a base coat! This step is super important when it comes to nail care. Without a base coat, nails can become dry, stained, and your manicure's longevity will not be great.
Step 2:
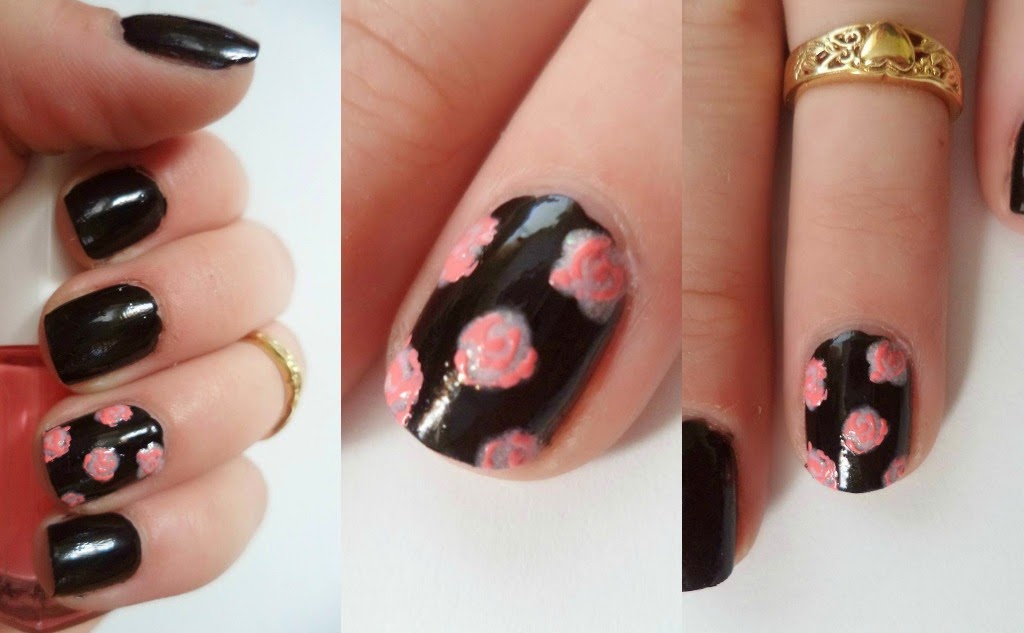
Paint thumb, pointer, and pinky fingers with a white polish (or really any color that you choose) and the ring and middle fingers black.
Step 3:
Once the black polish has dried, apply 5 dots to act as guidelines for the petals. Apply them to the lower right or left quadrants of the nails leaving enough space to paint in the center of the flower. I think they look better when the petals are close together and similar in size, but don't be afraid to play around with it! Try using different sized dots or not lining them up perfectly.
Step 4:
Using white nail polish and a skinny brush apply curved lines to both sides of the dots extending to the top of the nails. The lines do not need to be perfect, in fact, they look more realistic if they aren't perfect curves! Do your best to leave black space between petals, but it is not completely necessary! You can always go back and add black lines between later!
TIP: Flicking the brush creates the best results. DO NOT try to do this step slowly. Honestly, I hold my breath when I do this part... so try that if you're struggling. (:
Step 5:
Fill in the center of the curved lines with the same white polish.
Step 6:
In the blank black portion of the nail apply white dots with a dotting tool. This part it is really necessary to make sure the dots are not all the same size. It creates dimension. Try to stay within the same range of size, but go a little larger and smaller on some.
Step 7: (Optional)
You can totally apply your top coat in step 6 and be done, but this step is what really adds dimension and realness.
Using a very sheer gray polish and a skinny brush, add some splotches to the tops and bottoms of the petals. Make sure you don't give the gray spots a clean edge, make parts of the gray areas higher up on the petal than other parts.
Step 8:
Apply your favorite top coat and let dry completely!
I definitely think the top coat is the most important part to any nail design. A design might not look that great before the top coat, but once a clear coat is applied, it seems that the design just magically gets prettier and neater! This is my absolute favorite step... ask just about anyone that has had their nails done from me!
As you can probably tell from the pictures, the right nail has been finished with a top coat and the other has not, I just wanted to show how much of a difference it makes!
Voila! You're finished.
If you ever try out some of my nail designs please tweet or instagram me using #heyhar
I would absolutely love to see the recreations!
Thanks and remember to follow the link on any of my social media pages to vote every 24 hours if you like any of my nail designs!
Harli
Monday, April 21, 2014
Spring Daze
When I think of spring I think of baby animals, flowers, sunshine, and pastel colors. Spring is my favorite season because everything seems to become new and bright. Winter is on its way out and summer is just around the bend. While basking in the beautiful sun and appreciating all of the flowers in the yard this morning, I had a sudden urge to give myself a mani as equally beautiful as a warm spring morning. So that's what I did; 30 minutes later I ended up with a pastel-colored-spring-flower manicure that I absolutely love!
You Will Need:
Tip: You can really use anything with a pointy tip in place of the dotting tool/toothpick.
(Bobby pin, pencil, needle etc.)
Step 1:
With the NUDE polish, coat the middle and ring fingers completely and let dry.
I love you Spring!
Harli
You Will Need:
Tip: You can really use anything with a pointy tip in place of the dotting tool/toothpick.
(Bobby pin, pencil, needle etc.)
Step 1:
With the NUDE polish, coat the middle and ring fingers completely and let dry.
Step 2:
Coat the thumb, pinky, and pointer fingers with the PASTEL polish you chose. Allow to dry completely then give them a second coat.
Step 3:
On the nude nails create, at most, 2 small circles per nail.
Step 4:
Paint 4-6 small petals around each circle and fill in the empty spaces surrounding the flowers with a few half ovals.
optional: You can fill in the empty spaces between the flowers with a few small dots. It makes the nail looks more like lace.
Step 5:
Using the clear polish of your choosing, dot it into the center of the flowers and centered just above your cuticles on the pastel nails.
Step 6:
Firmly press the nail gems into the dots of clear polish.
Step 7:
Apply a fairly thick top coat.
I recommend Sally Hansen's Strengthening Top Coat because it dries quickly, doesn't chip, and makes your nails look super super shiny!
Allow your nails enough time to dry. If you are in a hurry try holding your nails under ice water for up to 3 minutes to speed up the drying process.
I love you Spring!
Harli
Labels:
feminine,
floral,
girly,
hand,
hands,
harli,
heyhar,
heyharli,
lace,
lacquer,
nail art,
nail care,
nail design,
nail designs,
nail lacquer,
nail polish,
nails,
polish,
springs
Thursday, April 17, 2014
Bada Bling Bada Bloom
My family has a tradition that every year on our birthday we go shopping for our birthday gifts with my grandma. One of these shopping trips has forever stuck in my mind. My grandma would be considered a prude by most everyone. She is very old fashioned and definitely stuck in her ways.
We had been shopping for HOURS and everyone (myself included) was exhausted because of my inability to make a decision. After stopping at about a hundred different stores, I emerged from the dressing room in a kind-of-cute-but-kind-of-not dress. My grandma was waiting for me outside of the dressing room in a chaotic mess of people to see what I had tried on. Grandma stood up, looked me up and down, and uncharacteristically said, or more like yelled, "Oh my gosh Harli! You look so bitchen in that!" I mean, she said it loud enough for just about everyone to hear. Most of them turned and laughed and some looked somewhat shocked. Although the dress made my grandma use the term "bitchen" I still did not buy the dress, I don't even remember what I decided on. All I know is that I will never forget that moment and neither will the rest of my family because my old-fashioned grandma had a burst of super sass.
In spirit of my sweet, but occasionally sassy grandma, these nails were inspired. The vintage floral portion of the nails are based on the old-fashioned grandma my entire family knows and the added bling is the part of her that yells "bitchen" in crowded places.
YOU WILL NEED:
Black Polish-I used "Black Lace" by NYC
Light Pink Polish- I used "Pink Champagne" by NYC
Darker Pink-I used a shade from the Flower brand
Green Polish-I used "Jade" by Essie
A larger dotting tool
A smaller dotting tool
Top Coat-I recommend Sally Hansen's no chip top coat
Base Coat-I used Revlon's base coat
(This is about the size you want your dotting tool to be. $.99 on Ebay)
*Prep nails for manicure by thoroughly washing off any excess polish, oils, and dirt from your nails. This step is to ensure a longer lasting mani.
Step 1:
Apply a thick coat of the base coat polish of your choice. This is so the polish doesn't stain your nails and just keeps them healthier over all.
We had been shopping for HOURS and everyone (myself included) was exhausted because of my inability to make a decision. After stopping at about a hundred different stores, I emerged from the dressing room in a kind-of-cute-but-kind-of-not dress. My grandma was waiting for me outside of the dressing room in a chaotic mess of people to see what I had tried on. Grandma stood up, looked me up and down, and uncharacteristically said, or more like yelled, "Oh my gosh Harli! You look so bitchen in that!" I mean, she said it loud enough for just about everyone to hear. Most of them turned and laughed and some looked somewhat shocked. Although the dress made my grandma use the term "bitchen" I still did not buy the dress, I don't even remember what I decided on. All I know is that I will never forget that moment and neither will the rest of my family because my old-fashioned grandma had a burst of super sass.
In spirit of my sweet, but occasionally sassy grandma, these nails were inspired. The vintage floral portion of the nails are based on the old-fashioned grandma my entire family knows and the added bling is the part of her that yells "bitchen" in crowded places.
Black Polish-I used "Black Lace" by NYC
Light Pink Polish- I used "Pink Champagne" by NYC
Darker Pink-I used a shade from the Flower brand
Green Polish-I used "Jade" by Essie
A larger dotting tool
A smaller dotting tool
Top Coat-I recommend Sally Hansen's no chip top coat
Base Coat-I used Revlon's base coat
Step 1:
Apply a thick coat of the base coat polish of your choice. This is so the polish doesn't stain your nails and just keeps them healthier over all.
Step 2:
Apply the black polish of your choice. Wait for the polish to completely dry and then add a second coat.
Step 3:
Using the larger dotting tool apply 3 to 5 large dots of the light pink polish to whichever nails you want to be accented. I did it only on the ring fingers.
TIP: You may need to apply two coats of the light pink if you desire a more vibrant color... the black often causes the light pink to appear faded.
Step 4:
Once the dots have completely dried (trust me, it's easier if they are dry! I learned the hard way.), using the smallest dotting tool and the darker pink polish, create swirls in the middle of the light pink dots. Surround the swirls with curved lines to create the petals of the flowers.
Step 5:
Using the small dotting tool use the green to create tear dropped shapes around the flowers for the leaves. Leaves are my favorite part because by using different shapes for the leaves, it creates a lot of uniqueness and diversity.
Step 6: (OPTIONAL)
Apply small glitter to the black spaces on the flower nail(s). Apply silver circle gems to the bottom on each nail, centered.
Just like my grandma, these nails are the perfect mix of old fashioned and sassy.
Harli
Labels:
art,
bling,
bloom,
floral,
hand,
hands,
harli,
heyhar,
heyharli,
lacquer,
nail art,
nail care,
nail design,
nail designs,
nail lacquer,
nail polish,
nails,
polish
Subscribe to:
Posts (Atom)