Showing posts with label bling. Show all posts

Friday, September 5, 2014

DIY Flash Tattoos


IF you have been on the internet at any point this summer, I am sure you have seen someone flaunting these little gems. Flash tattoos are simply metallic temporary tattoos, how freakin' cute are they? They are actually pretty expensive... $25 for a couple of sheets. Personally I think that is just absurd for something temporary... doesn't Flash Tattoo realize some of us are trying to get through college??? 
I created a way to DIY them for under $10!

WAY #1:


  • Pull out a page protector and the metallic marker or eyeliner of your choosing. 


  • Draw your desired tattoo onto the page protector. (Go over the design a few times to make sure it is still wet by the time you need to apply it!)


  • Once you are content with your design, place the side you drew on right where you want it to show up on your skin. 


  • Then apply some pressure and hold there for several seconds. 


  • Once you lift off the page protector the design will be transferred to your skin! 


  • Using Liquid Bandage trace over the top of your design to make it waterproof. If you don't want the design to last for several days spray use hairspray instead of liquid bandage for a more temporary tattoo. 

WAY #2:


  • If you are doing a very big design or an easy to draw design, you can always just draw right onto your skin and then apply the liquid bandage! 


Here are some photos of the designs I tried (I went kind of crazy haha):


 Well, I hope you love these as much as I do! Let me know if you try them out.

XX,
    Harli


Monday, June 16, 2014

#ManicureMonday

I did my own nails for the first in like... months! I usually can't do super cute things to my own nails because they end up getting ruined when I give other people manis. I am totally obsessed with the design I created. It was inspired by some nautical nails I found on pinterest, but I just made them my own and changed them up drastically!

I completely love these. They are trendy for right now because of the double accent nails, glitter polish, and negative space. I also used my favorite polish of the moment! 

Hope you love them as much as I do! 


Have a wonderful week!
Harli


Sunday, April 27, 2014

Totally Trendy Tribal

One of the best parts about the spring and summer months is the tribal everything ; tribal clothing, tribal jewelry, and definitely tribal nails. Sometimes I feel that the whole tribal trend can be a bit overbearing when not executed properly... there is such a thing as too much tribal print guys! So if you're on the hunt for some tribal nails, without over-doing it, then this post is most definitely for you! There's a hint of tribal, but not too much. So enjoy!

You Will Need:


Step 1: 
Using your colored polish, paint all of your nails except for you ring fingers with two coats. Paint your ring fingers with the gold polish. Let them dry completely.


Step 2:
Using the dotting tool and black nail polish paint 2 "V"s onto your middle nails. 


Step 3:
Using your dotting tool and your black polish, paint small lines extending out from the top "V". Connect the lines to the "V" going downward. 


Step 4:
Carefully fill in the small triangles. This is the hardest step because it is easy to go outside of the lines if you don't work slowly... so Be Careful!


Step 5:
Once your nails have dried completely, top them off with a thick layer of your favorite top coat. This will seal in the design for longer and make the nails look shinier.


*Top off the look with a super cute Midi-Ring like the one Ellee is wearing. I promise it totally completes the look! 


There you go! A 5-step-totally-trendy-spring-ready manicure. The great thing about this mani is that it looks a lot more difficult than it actually is, so people will be impressed when you tell them you actually did it yourself. 
Don't be afraid to add your own twist to this manicure! It's so simple, there is definitely room to spice it up with some of your own flare!

Harli 


Thursday, April 17, 2014

Bada Bling Bada Bloom

My family has a tradition that every year on our birthday we go shopping for our birthday gifts with my grandma. One of these shopping trips has forever stuck in my mind. My grandma would be considered a prude by most everyone.  She is very old fashioned and definitely stuck in her ways.

We had been shopping for HOURS and everyone (myself included) was exhausted because of my inability to make a decision.  After stopping at about a hundred different stores, I emerged from the dressing room in a kind-of-cute-but-kind-of-not dress. My grandma was waiting for me outside of the dressing room in a chaotic mess of people to see what I had tried on. Grandma stood up, looked me up and down, and uncharacteristically said, or more like yelled, "Oh my gosh Harli! You look so bitchen in that!" I mean, she said it loud enough for just about everyone to hear. Most of them turned and laughed and some looked somewhat shocked. Although the dress made my grandma use the term "bitchen" I still did not buy the dress, I don't even remember what I decided on. All I know is that I will never forget that moment and neither will the rest of my family because my old-fashioned grandma had a burst of super sass.

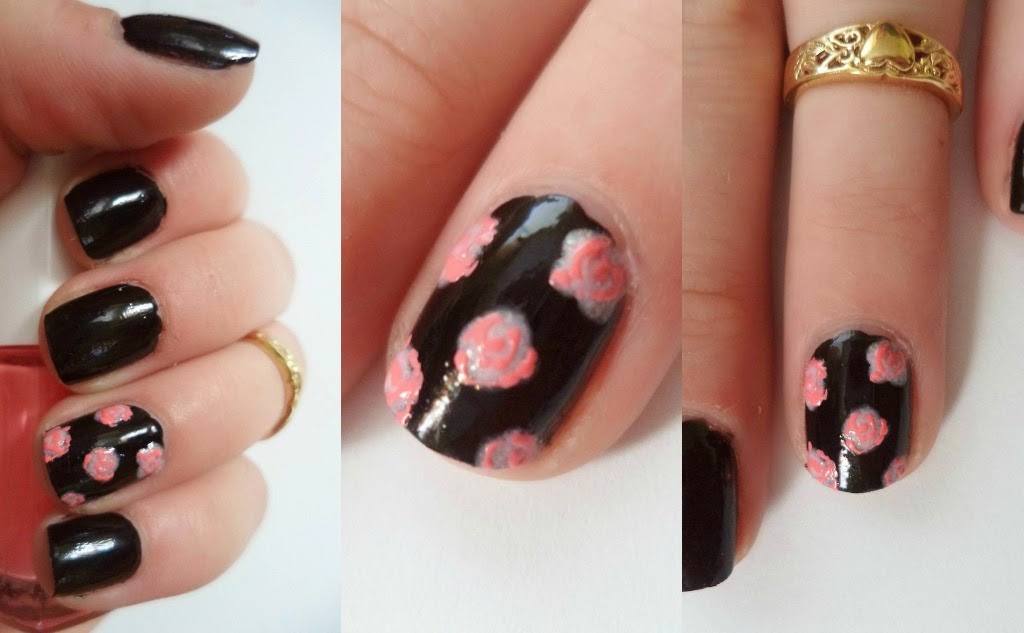
In spirit of my sweet, but occasionally sassy grandma, these nails were inspired. The vintage floral portion of the nails are based on the old-fashioned grandma my entire family knows and the added bling is the part of her that yells "bitchen" in crowded places.

YOU WILL NEED:
Black Polish-I used "Black Lace" by NYC
Light Pink Polish- I used "Pink Champagne" by NYC
Darker Pink-I used a shade from the Flower brand
Green Polish-I used "Jade" by Essie
A larger dotting tool
A smaller dotting tool
Top Coat-I recommend Sally Hansen's no chip top coat
Base Coat-I used Revlon's base coat
                                                                       

                                                          (This is about the size you want your dotting tool to be. $.99 on Ebay)

*Prep nails for manicure by thoroughly washing off any excess polish, oils, and dirt from your nails. This step is to ensure a longer lasting mani.

Step 1:
Apply a thick coat of the base coat polish of your choice. This is so the polish doesn't stain your nails and just keeps them healthier over all.


Step 2:
Apply the black polish of your choice. Wait for the polish to completely dry and then add a second coat.


Step 3:
Using the larger dotting tool apply 3 to 5 large dots of the light pink polish to whichever nails you want to be accented. I did it only on the ring fingers.

TIP: You may need to apply two coats of the light pink if you desire a more vibrant color... the black often causes the light pink to appear faded. 

Step 4:
Once the dots have completely dried (trust me, it's easier if they are dry! I learned the hard way.), using the smallest dotting tool and the darker pink polish, create swirls in the middle of the light pink dots. Surround the swirls with curved lines to create the petals of the flowers.


Step 5:
Using the small dotting tool use the green to create tear dropped shapes around the flowers for the leaves. Leaves are my favorite part because by using different shapes for the leaves, it creates a lot of uniqueness and diversity. 


Step 6: (OPTIONAL)
Apply small glitter to the black spaces on the flower nail(s). Apply silver circle gems to the bottom on each nail, centered. 


Just like my grandma, these nails are the perfect mix of old fashioned and sassy.

Harli